
Introduction Microsoft Dynamics AX
What
is Microsoft Dynamics AX?
Microsoft Dynamics AX is the Microsoft
enterprise resource planning, or ERP,
solution for businesses that empowers your people to anticipate and embrace
change so that your business can thrive. This is a rich ERP capabilities also support human resources, financials, project management, and sales and marketing.
AX
Industry Focus:
Microsoft Dynamics AX is a complete ERP Solution which contains following major category for industries to fulfill their business needs.
Microsoft Dynamics AX is a complete ERP Solution which contains following major category for industries to fulfill their business needs.
Manufacturing
|
Distribution
|
Retail
|
Public
sector
|
Services
industries
|
1. Production
control
2. Master
planning in the process manufacturing
3.
Discrete manufacturing
4. Lean
manufacturing environments
|
1. Warehouse management
2. Transportation management
3. Inventory management
|
1. Call center
2. e Commerce
3. Brick and Mortar
|
1. Fund accounting
2. Grants
3. Projects
|
1. Dispatching
2. Subscription
|
Development
in Microsoft Dynamics AX
In Microsoft Dynamics AX 2012 and earlier version the development environment is known as MorphX IDE using X++ language but the development environment in d365 is done in Visual Studio using X++ OR C# language based on developer need.
System Requirement for Development

Terminology
and Concepts
Before hands on in Visual studio, there are some key components to understand before starting development. Following four key components are there:
Model
1. In Microsoft Dynamics 365 F&O,
the Application Object Tree (AOT) are called Models.
2. If we open the Application Explorer
in Visual Studio, we’ll see all the AOTs.
3. Examples of AOTs are Tables, Forms,
Reports, Jobs, and Workflows etc.

Element
1. Elements in Dynamics AX are the
objects that reside in the AOT and the Application Explorer in Visual Studio.

Project
1. A particular model may contain
multiple Visual Studio projects.
2. However, a project may only belong to
one model.

Package
1. A Dynamics AX package is a deployment
unit that may contain one or more models.
2. In addition to elements, it includes
model metadata, which is description data that defines the properties and
behavior of the model.
3. A package can be exported to a file
which can then be deployed into a staging or production environment.
Creating Projects, Models and Packages
i.
We
defined a model as a collection of elements that represent a distributable software
solution. Creating a model involves specifying metadata like the model's
name and description.
ii.
We
can create a model using a wizard. And when we create a model, we have the
option to choose whether we want to create that model in a separate package or
in an existing package.
Over-layering vs Extension Model
Over-layering (Customization)
|
Extension
|
If we create a model in an existing package, that means we'll be using
the over-layering or customization development approach.
|
If we create a model
in a separate package, that implies we will be using the extension
development approach.
|
This way your new model has access to those elements.
|
Developing this way allows us to
access the elements from any models that we selected as referenced models and
the wizard.
|
Taking this approach allows you to customize metadata and source code
at a higher layer. For example, you can change the design of a form in
the user layer.
|
By creating extension
elements, all of the customizations and code are stored in a separate
assembly.
|
However, downside of this method could potentially increase the cost of
upgrading to new versions of AX in the future.
|
This approach is also ideal when it
comes to upgrading so we can eliminate metadata conflicts in our code.
|
Creating
a Model
1. To create a new model, we'll going to
the Dynamics AX menu, and under the
model management group, we'll choose create model. This opens the model
wizard.

2. When we click next, wizard
provides 2 options to choose for Over-layering or Extension.
3. Once a model is created, we
can upgrade the model.
a. Go to the Dynamics AX menu.
b. Under model management, we
can choose update model parameters.
c. And this will bring us back
to the wizard screen.
Using
Elements
1. Elements are located in the
Application Explorer and the AOT.
2. When editing elements, we use what's
called the element designer to configure the properties and set different
options for that element.
3. For example, we can add fields to a
table using the element designer.
4. Adding element in project
a. There are several ways to add
a new element to your project.
b. We can right click the
project from the Solution Explorer.
c. And we can choose the add
option, and then we can choose new item.
Performing
Builds
1. When we create new models and
projects that contain new elements or customized elements, we need to build
them so that they can be used by the application.
2. Below is the list of build operations which can be performed
when we perform a build:

3. To build a project, simply choose
Build from Build menu in Visual Studio.
4. We can also build a model by choosing
Build Model from Dynamics AX menu.
Application Stack
i.
The
application stack and server architecture in AX is designed to align with three
key pillars, which include the web-based client, cloud readiness and the Visual
Studio development stack.
ii.
The
application stack has been divided into three distinct models.
1. Application Platform
2. Application Foundation
3. Application Suite

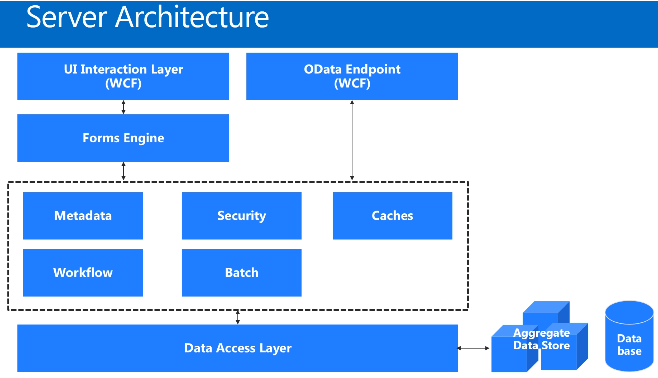
Server Architecture
i.
Below
is the server architecture of Dynamics AX
Labels,
Resources and Base Enums
Label in Dynamics AX
a. Label files are small data
structures that keep all related and new labels in a central storage.
b. We can use labels to specify
the user interface text for forms and reports.
c. When we update the label, the
change is propagated to everywhere in the system where employee is currently
used.
d. Labels are created in the
label editor and then used in text-based properties in the AOT or in X++ code.
Create and Use Label
a. Label file is just like a
resource file in VB 6.0.
b. To add, just add a new item
in project.
c. Click Labels and Resources in
left pane, and choose label file from middle pane.
d. Hit OK to add the label file
in project.
e. The extension of label file would
be .txt.

Resources
a. Resources are the way to
manage the pictures, icons, and other visual representations that will be used
within the user interface.
b. This can be accessed through
the resource library, adding additional resources or using resources that are
at a URL location.
c. The URL location would be
used in the case of an IIS server instance with an established product photo
library.
Create and Use Resources
a. This is same as we added
label, we just need to select Resource from middle pane.
Base Enumeration
a. Base enumeration, or referred
to as an enum, is a list of literals with an assigned value.
b. You will need to create base
enumerations before you can begin using them in your code.
Creating Base Enumeration
a. To add, just add a new item
in project.
b. Click Data Type in left pane, and choose Base Enum middle pane.

Extended
Data Types in AX
Data Types
a. X++ data types are divided
into primitive data types and composite data types.
b. You can create extended data
types and base enums that build on the primitive data types.
c. These can be created only by
adding these types of elements to your projects.
d. They cannot be created in
code as a language construct.
Primitive Data Types
a. The basic set of primitive
data types in AX map to underlying data types that exist in DB.
b. These primitive data types
can be expanded to create extended data types which are reusable data types
that have a specific definition and specific properties set.

Creating an Extended Data Types
1. An EDT is a primitive data
type or container with a supplementary name and some additional properties set.
2. For example, we can create an
EDT called name based on the primitive data type of string.
3. To add, just add a new item
in project.
4. Click Data Type in left pane, and choose EDT type middle pane.
Tables
in AX
a.
Table:
i.
Tables
are created based on enumerations and extended data types that we created earlier.
ii.
Table components: table components look like
as follows:

b.
Creating Table in AX
i.
Creating
table process is same as we create other elements in the AX project
ii.
To
add, just add a new item in project.
iii.
Click
Data Model in left pane, and choose Table middle pane.

c.
Adding Fields to Tables
i.
We
can add data types to the table so that we can store information.
ii.
Data
types include fields, base enums, and extended data types.
iii.
We
will use some of the previously created extended data types along with some new
fields to build our tables.
iv.
Drag and Drop fields from Data Types
folders into Table to add fields in table.
d.
Table Inheritance
i.
A
table can be extended from or derived from another table.
ii.
Each
table has a support inheritance
property and extends property, which
together, control table inheritance.
iii.
We
can set the support inheritance to yes and then use of extends property to
choose which base table in the system we want to extend with the current table.
iv.
Example:
e.
Temporary Table
i.
There
are two main types of temporary tables.
1. InMemory temporary table
2. TempDB temporary table
ii.
These
are controlled using the table Type
property on the properties node of a table.
iii.
Common
uses for temporary tables include reporting.
iv.
A
TempDB table is created in the
database only when it is in use or instantiated by a particular process.
v.
InMemory tables are held inMemory until
the size reaches 128 kilobytes.
f.
Queries
i.
A
query element can be designed as a modular business object.
ii.
Queries
can contain one or more tables as a data source.
iii.
These
tables may be nested within each other if they are related like in the screen
shot.
g.
Adding Queries in AX Project
i.
Creating
query process is same as we create other elements in the AX project
ii.
To
add, just add a new item in project.
iii.
Click
Data Model in left pane, and choose Query middle pane.
iv.
Drag
the table and drop into Data Source
node to bind the table with query.
v.
We
can then add Fields in the query
which we want to return from query.
vi.
To
create a relationship with another table, we need to drag and drop the other
table in Data Source node and create
relationship using the key id fields.
Tables
Indexes in AX
a.
Index Types
a.
Primary Index
i.
Provides
a unique key to each record in a table.
ii.
This
is the index that's used for record caching in Dynamics AX.
iii.
In
order to be a unique index, the allowed duplicates property on the index must
be set to no.
iv.
This
prevents the insertion of duplicate key values in a table.
b.
Clustered Index
i.
A
clustered index organizes the data in the table in the order of the index.
ii.
A
clustered index can also be unique in the case that the primary index and the
clustered index are the same.
c.
Non-Clustered Index
i.
A
non-clustered index provides a way to quickly reference data found in the
clustered index using a specific set of columns.
ii.
An
example of a non-clustered index is the index at the back of a textbook.
b.
Creating an Index
a. Index can be created on a
Table element.
b. Beneath the table node we
have a node for Indexes.
c. To create a new index, we can
right-click the indexes node and choose new index.
d. Expand the Fields node and just drag
the field right down on top of that index node and it'll automatically create
the index on that field for you.
e. Set the properties of index
such as Duplicate, Alternate Key etc.
f.
To
create a Clustered Index, for instance on multiple field, drag multiple fields
and drop on Index.
g. Go to table and set the
Clusted Index property of table to newly created clustered index.
Tables
Relations in AX
A relationship is
created between tables with related data. It defines how they're related and is
set on the relations node on a table element.
a.
Relationships Types
a.
Normal Relation
i.
A
normal relation is used to specify a relation without any conditions.
ii.
In
the field property, we select the field in the primary table that relates to a
field in the present table.
iii.
In
the related field property, we would then select a field in the related table.
b.
Foreign key relation
i.
This
is used to specify a correspondence between a foreign key fields in the present
table to the primary key field in another parent table.
ii.
Foreign
key relations are usually set on a child table.
Creating a Relation
a. To create a relationship, we
go to the table we want here in our designer and under the table node, we have
an option for relations.
b. We can right click this and
specify new and we can choose relation or foreign key relation.
c. Now we can right click this
relation and choose new and we have the option to choose a normal foreign key
relation or a related fixed field foreign key relation.
d. Set properties to tell the
fields for this relation.
Form
Patterns in AX
Form patterns are
applied to forms and determine the specific layout as well as the controls and
containers that are required for that particular pattern. Sub-patterns are
applied to certain controls or tabs on the form. Dynamics AX has nearly 40 form patterns that you can apply to
your custom forms.
a.
Details Master Form Pattern
a. This is a primary method for
entering data into Dynamics AX.
b. These form patterns allow the
user to view, edit, and act upon data.
c. All content in these form
types is structured into FastTabs which can then be expanded or collapsed,
allowing for multiple FastTabs to be open at the same time.
b.
Form Part FactBoxes Form Pattern
a. In general, these are used to
provide related information for a record.
b. They make sure the user does
not have to open additional forms to get important information that they need
such as totals, balances, or overdue orders.
c.
Simple List Form Pattern
a. The simple list pattern
displays details for a simple entity as a grid.
b. This typically will have six
fields or less per record with no child parent relationship.
c. A list page is another type
of form pattern which still displays data in a grid format.
d.
Table of Contents or Setup Page Form Pattern.
a. This type of pattern is used
on a form to display setup information.
b. It's commonly used as a setup
or parameter page that are frequently accessed through the navigation menu as
well as through workspaces.
c. This pattern should be used
when two or more logically related forms are needed for configuring setup.
e.
Operational Workspaces Form Pattern
a. Workspaces are a new concept
that takes over as a primary way to navigate to tasks and specific pages.
b. A workspace must be created
for every significant activity supported in the product. Such an activity is
less granular than a task but more granular than a legacy area page.
c. The workspace must provide a
one-page overview of an activity to help users understand the current status,
the workload ahead, and the performance or of the process for the user.
d. There are two types of
workspace form patterns: the traditional workspace and the operational
workspace.
e. It's always encouraged to use
the operational workspace as it has superior performance characteristics due to
the set of components it contains.
a.
Sub Pattern
1. Sub patterns are applied on
controls.
2. This is similar concept as we
have user-controls in ASP.NET.
3. The process for applying
sub-patterns is similar to applying a pattern to a form.
4. We acquire the target
control.
5. We determine which
sub-pattern we want to apply. Then we apply the sub-pattern.
6.
Types of Sub Pattern
a.
Custom/Quick Filter
i.
These
are used where filters are modeled on the form.
ii.
Custom
quick filters is very similar to a custom filter.
iii.
The
only difference is that the form pattern requires the quick filter sub-control.
b.
Image Preview
i.
This
can be used for most images within a form container, especially in a Fast Tab.
ii.
This
could be used in conjunction with the fields and field group sub-pattern for
combining images and any associated fields
c.
Fields and Fields Groups
i.
The
fields and fields groups sub-pattern provides a responsive layout for
containers that contain only fields.
ii.
For
example, a tab page containing a Fast Tab.
d.
Selection Tiles
i.
Selection
tiles show a set of tiles or charts in a workspace section.
ii.
This
should be modeled on a tab page in a workspace form.
b.
Form Properties
i.
There
are variety of form properties available to set the layout of a form


Form
Creation in AX
Create a Form
a. Right clicking our project,
choosing add, and choosing new item.
b. The forms live here in the
user interface group.
c. We can set the properties of
the form.
d. On the right pane, we can set
the form pattern by right clicking in it.

a. Adding Controls and Elements to a Form
i.
Once
we have created a form, we need to add a data source and form controls so that
we can define the layout and display information.
ii.
Certain
form patterns require certain controls to be added in a particular order.
iii.
Adding
Elements
1. The first item we need to add
is a data source.
2. We will specify which table
or query we want to add to feed data into the form.
3. Add Data Source
a. To add data source, select
the Query element and we can simply
click it and drag it out to the data sources node on the form.
4. Apply Form Pattern
a. To apply our pattern, we'll
go over here in the right pane to our design node.
b. We can right click. And
we'll choose apply pattern. And for this form, we're going to use one
called task single.
c. And we'll notice here the
pattern tab automatically populates with these different controls that are
required to create this form with the task single form pattern. And these are
the order that they're required in.
5. Adding Control
a. To begin adding controls, we
simply right click on the design node and we'll choose new.
b. And from here, we have all
these different types of controls that can be added to the form.
c. Once we add all required
control by form pattern, it would look like as follows:

6. Adding Fields in the Grid
a. First we need to set the Data
Source property of the grid from this available list of data sources of the
form.
b. We can drag the fields from
fields list and drop into grid.
c. We can also move up/down the
fields if we want to change the sequence of fields into the grid.
7. Preview the Form
a. We can preview the form by
clicking on the Preview button.

b.
Menus
in AX
a.
Types of Menu Items
i.
There
are 3 main types of menu items that are used in AX.
ii.
Display
Menu
1. This must be used for
runnable application objects that primarily present forms or dialogs to the
user.
2. We would attach the menu item
type of display to a form for example.
iii.
Output
Menu
1. This must be used for runnable
application objects whose primary function is to print a result.
2. A good example for using an
output menu item type would be an SSRS report.
iv.
Action
Menu
1. This must be used for
runnable application objects whose primary function is to do some kind of job
such as creating or updating transactions in the database, and this would be
linked to a class.
b.
Create Menu Items
i.
Right
click our project, we choose add and new item, and to display a form, we need
the display menu item.
ii.
And
that is located in the user interface group.

iii.
After
adding menu, you can set the properties to associate the menu with a form.
iv.
Hookup
Menu Item with Navigational Panel
1. So now, we need to place
these menu items on a navigational page on a certain menu so that we can click
them in the UI.
2. Let’s add it onto the
organization administration navigational menu page.
3. And to do that, we’re going
to go to the Application Explorer
and we'll right click on the AOT node and choose model view.
4. Go to the Application Suite model.
5. Expand the user interface
node.
6. And finally, expand the menus
node. Now, here we can see all the different navigational menus in the system.
7. Scroll down to the Organization
Administration menu and we'll right click it and we'll choose this option
called Create Extension.
8. Open the resources sub menu.
9. Now, drag and drop the newly
created menu item here in resources sub menu.
Build the application and
if you run the application, you’ll see the newly added menu.
a.
X++
Overview
a. X++ is an object-oriented
programming language which consists of three main components.
b. Those components are classes,
methods, and objects.
c.
X++ Code Editor
i.
X++ code for a Dynamics AX
application is written in the code editor for Visual Studio.
ii.
So
it would have all coding features that a developer get in Visual Studio for any
other programming language, such as IntelliSense etc.
iii.
The
X++ language is fully integrated into the Visual Studio environment.
iv.
You
can navigate to methods and classes in the code editor window using the
navigational drop-down menus located at the top of the code editor window.
d.
Create a Runnable Class
i.
Adding
a runnable class is same as we add a new item in project.
ii.
Right
click project, select add new item and select Code à Runnable Class from
following dialog box:

iii.
This
will add a new class to the project which will have a main() method same as we
have in Console application in C#.
iv.
Write
the following code in main() method:
Info(“Hello AX World!”);
v.
Build
the application.
vi.
Set
the newly created class as startup object in solution explorer.
vii.
Hit
F5 to run the application.
viii.
This
will open the browser and display output in it.
e.
Data Types in X++
i.
There
are two types of Data Types in X++.
ii.
A)
Composite data types and B) Extended data types
iii.
Composite
Data Types
1. Composite data types are
those that contain other data type constructs.

iv.
Extended Data Types
1. Extended data types are
commonly abbreviated as EDTs.
2. An EDT is a primitive data
type or container with a supplementary name and some additional properties set.
3. We already discussed EDTs in
detail in this course.
4. The example of EDT is tables.
5. The Class can also be used as
data type.
f.
Variable Declaration in X++
i.
Below
are some facts about declaring a variable:

ii.
Var
keyword can be used to declare a variable.
iii.
Code
example of variable declaration:

g.
Key Operators in X++
i.
Below
are some arithmetic operators:

ii.
Below
are some assignment operators:

iii.
Below
are some relational operators:

iv.
Order of Operators Precedence
1. Below is the order of
operators in X++

h.
Basic Syntax in X++
i.
Basic
syntax guidelines:

ii.
Basic
output syntax:

iii.
Conditional Statement
1. X++ provides following
statements as conditional statements:
2. a) IF ELSE and b) SWITCH
3. Below is the syntax of both
of these condition statements

iv.
Loop Statement
1. X++ provides following loop
statements:
a. FOR Loop
b. WHILE Loop
c. DO WHILE Loop
2. The working of all these
looping statements is same as it is in C#.
3. The syntax of these looping
statements is also same as C#.
4. Example:

i.
Debugger in X++
i.
To
debug X++ code in AX, you will use the debugger in Visual Studio.
ii.
The
debugging process is similar to debugging any other application created with
Visual Studio.
iii.
For
example, the standard tools for examining the application are available when
your code is stopped at a breakpoint.
iv.
Info Logs
1. Another tool specific to debugging
is called the Infolog.
2. Frequently, info statements
are added to code to log status messages as the application is running.
3. You can view these Infolog
messages directly within Visual Studio as well.
4. We can go to the view menu
and choose Infolog to bring up Infolog box.
b.
Classes
in X++
a.
Class Structure
i.
The
class structure is same as we have classes in C#.
ii.
A
class is a software construct that defines the data and methods or behavior of
the specific concrete objects that are subsequently constructed from that
class.
b.
Base Class
i.
The
base class structure is same as we have classes in C#.
ii.
The
base class which can then be inherited by another class.
iii.
The
base class is different from Runnable class, therefore, we choose Class in
following dialog box instead of Runnable class to create a base class:

c.
Methods in Class
i.
The
methods in a class is same as we have we create methods in C# class.
ii.
Below
is the types of method which are supported in AX:

iii.
Example: Watch the video of Methods module to see how it implement the
data entry in Vehicle table.
d.
Inheritance
i.
The
inheritance concept is same as we have in general OOPs.
ii.
Inheritance
is a concept where one class can inherit all of the methods and variables from
another class. A child class inherits the methods of the parent class.
Additional methods can be applied to the child class and inherited
methods can be overridden.
iii.
Example:
1. We have Vehicle Entry class
which is used to entry data in Vehicle table.
2. Now we want to extend the
functionality of VehicleEntry class into a new class called TruckVehicleEntry
class.
3. In X++ we use extends keyword to inherit a base
class.
4. To call parent class method,
we use super() keyword as its been
called in the setupDialog() method below:

c.
Database
Manipulation
a. Data manipulation in Dynamics
AX empowers the developer with the tools to view, insert, update and delete
data from the database.
b.
Data Retrieval
i.
SELECT Statement
1. The SELECT statement fetches or manipulates data from the database, or
both fetches and manipulates data from the database.
2. All SELECT statements use a
table variable to fetch records. This variable must be declared before a select
statement can be executed.
3. The SELECT statement only
fetches one record or field at a time. To fetch additional records, you
can use the next statement.
4. If you need to traverse a
number of records, it's more appropriate to use WHILE SELECT statement.
5. The results of a SELECT statement are returned in a table buffer variable.
6. If you use a field list in
the SELECT statement, only those fields are available in the table variable.
7.
Syntax of SELECT Statement

ii.
WHILE SELECT Statement
1. WHILE SELECT
statements are used to handle data, they're the most widely used form of the SELECT
statement in X++.
2. WHILE SELECT
loops over many records that meet a certain criteria, if we were to specify in
a WhereClause, and they can execute a statement on each record that they loop
over.
3. In a WHILE SELECT, the select statement itself is executed only one
time, immediately before the first iteration of the statements in the loop.
4. Example:
If we put following code in runnable class and execute it, we can see the
output in browser.

c.
Reading Data using Class
i.
We
can use a SELECT statement, a query to go specify which data we want and how we
want to view it.
ii.
We
have this BulkVehicle class which is doing a bit of the same thing as our
VehicleEntry class at the beginning here.
iii.
We're
declaring two tables to use. That's our vehicle table and our vehicle
maint table, which is the vehicle maintenance table.
iv.
The
WHILE SELECT statement will read the data from database and will populate the
variables.
v.
Code Snippet

d.
Transaction Integrity Checking
i.
The
transaction integrity checking process is performed by the Transaction Tracking System which is commonly abbreviated as TTS.
ii.
Following
3 commands are used to Begin, Commit and Rollback transactions in X++.
1. ttsbegin à begin transaction
2. ttscommit à commit transaction
3. ttsabort à rollback transaction
e.
INSERT Data
i.
When
performing data INSERT, only the specified columns of those rows selected by the
query are inserted into the named table.
ii.
That
means you want to make sure your query is selecting the fields that you're
going to end up inserting into your table.
iii.
Secondly,
the columns of the table being copied from and those of the table being copied
to must be of type compatible.
iv.
We
use the insert() method to insert
data in table.
v.
Code Snippet
1. Here we are initializing the
table variable first.
2. Then we begin the transaction
using ttsBegin.
3. Then we assign the values to
table columns.
4. Then we call the insert()
method to insert data.
5. Finally call the ttsCommit
command to commit the data.

f.
UPDATE Data
i.
The
UPDATE command modifies existing data in a table with the contents of a table
buffer.
ii.
The
record is first retrieved from the database using a select statement.
iii.
The
data is then modified by assigning the new values to the fields in the table
buffer.
iv.
The
new values are then committed to the database using the update() method.
v.
Code Snippet
1. Here we are selecting the
data first using SELECT FORUPDATE
statement
2. And then modify the values
that we want to update in table.
3. Then we call the update()
method to modify the data in database.
4. Finally we call the
ttsCommit() command to commit the changes.

g.
DELETE Data
i.
The
delete method in a table can quickly delete one record, dozens, or millions of
records.
ii.
Using
the delete() method on a table will delete the current record from the
database.
iii.
However,
if we use a WhereClause, we can specify multiple rows to be deleted.
iv.
Code Snippet
1. Here we are selecting the
data first using SELECT FORUPDATE
statement.
2. Then we call the delete()
method to delete the data in database.
3. Finally we call the
ttsCommit() command to commit the changes.

d.
Exception
Handling in X++
a. There are many different
exception types, and the type differs depending on what caused error.
b. A majority of exception types
are determined by the kernel and are not normally thrown by application code.
All exception types, however, can be caught, and it is the developer's
responsibility to decide which exceptions need to be handled.
c.
Exception Types
i.
Below
is the list of exception types available in AX
1. Info
2. Warning
3. Deadlock
4. Error
5. Internal
6. Break
7. Dderror
8. Numeric
9. CLRError
10. CodeAccessSecurity
11. UpdateConflict
12. UpdateConflictNotRecovered
ii.
Below
is the list of exception types available in AX

d.
Key Commands for Exception Handling
i.
The
semantics of exception handling are identical to its use in C#.
ii.
Below
is the list of key commands for exception handling:

iii.
Try
1. The Try command signifies the
start of a block of code that you want to control with the X++ exception
handling system.
iv.
Catch
1. The Catch statements come
after the block of code and define what code is executed when each exception is
thrown.
v.
Retry
1. The Retry command tells the
system to go back to the Try
statement and attempt to execute the code again.
vi.
Finally
1. The statements provided in
the Finally clause are executed
irrespective of whether the try block threw any exceptions or not.
vii.
Code Snippet

a.
Security
Implementation in X++
a.
Security Architecture
i.
The
high level architecture is 3 step authentication.
1. Step-1:
The user signs in to AAD, which is Azure Active Directory.
2. Step-2:
Azure Active Directory redirects to the Dynamics AX client or the web
application.
3. Step-3:
Finally, the Dynamics AX start page is displayed.

b.
Authentication Services
i.
OData
services, JSON-based custom service, and the REST metadata service support
standard OAuth 2.0 authentication.
ii.
AAD Authentication Types
1. Microsoft Azure Active
Directory uses two types of authentication.
2. Native Client:
The first is the Native Client application.
This is the flow that uses a user name and password for authentication.
3. Confidential Client: Next, is what's known as the Confidential
Client or the web application, and this is an application that can keep a
client password confidential to the world.
iii.
AAD Authentication Flow
1. Below are the steps take
place for the AX user authentication:
2. Step-1:
First step is outlining a user authenticating and consenting for access.
3. Step-2: The
client would then receive an authorization token. This is in step two.
4. Step-3: In
step three, the client requests access to a resource with an authorization
code.
5. Step-4: In
step four, the client would then receive an access token.
6. Step-5: In
step five, the client requested data with this access token.
7. Step-6: And
finally, in step six, the client would then receive the data that it requested.

c.
Security Structure in AX
i.
The
security model is hierarchical, and each element in the hierarchy represents a
different level of detail.
ii.
Security Structure
1. The diagram below represents
the Security structure in AX

2. Permissions represent
access to individual securable objects like menu items and tables.
3. Privileges
are composed of permissions. And they represent access to tasks such as cancelling
payments and processing deposits.
4. Duties
are composed of privileges and represent part of a business process such as maintaining
bank transactions.
5. Role: Both
duties and privileges can be assigned to roles to grant access to in AX. AX
security is role-based. This means many security roles and duties are provided
to help base security definitions.
6. Using role-based security,
users are assigned to roles based on their responsibilities in the
organization.
7. Instead of identifying and
granting access to application elements, the administrator assigns duties which
users in the role perform.
d.
Create a Role
i.
Roles
can be created by a developer in Visual Studio
ii.
Or
role can be created by a system administrator in the AX client.
iii.
Create New Role in Visual
Studio
1. Add new item in project and
select Security Role from Security in following dialog.

2. Once a Role is added, we can
open the role in element designer and then create Duties and Privileges and
Permissions under this role.
e.
Create a Duty
i.
Duty
can be created by a developer in Visual Studio
ii.
Or
duty can be created by a system administrator in the AX client.
iii.
Create New Duty in Visual
Studio
1. Add new item in project and
select Security Role from Security in following dialog.

2. Once a Duty is added, we can
open the role in element designer and then create Privileges and Permissions
under this role.
3. After creating the Duty, we
ca associate it with a Role we created above by drag and drop the Duty in Role.


Thanks for sharing great post :- )
ReplyDeleteMicrosoft Dynamics 365 - The Definitive Guide: Microsoft Dynamics 365 Finance And Operations - Development Basic Notes >>>>> Download Now
Delete>>>>> Download Full
Microsoft Dynamics 365 - The Definitive Guide: Microsoft Dynamics 365 Finance And Operations - Development Basic Notes >>>>> Download LINK
>>>>> Download Now
Microsoft Dynamics 365 - The Definitive Guide: Microsoft Dynamics 365 Finance And Operations - Development Basic Notes >>>>> Download Full
>>>>> Download LINK FU
Nice blog. You have provided such a useful information in this blog. Thanks for sharing.
ReplyDeleteD365 Operations Training
D365 Finance Training
D365 Finance and Operations Training
Microsoft Dynamics 365 - The Definitive Guide: Microsoft Dynamics 365 Finance And Operations - Development Basic Notes >>>>> Download Now
ReplyDelete>>>>> Download Full
Microsoft Dynamics 365 - The Definitive Guide: Microsoft Dynamics 365 Finance And Operations - Development Basic Notes >>>>> Download LINK
>>>>> Download Now
Microsoft Dynamics 365 - The Definitive Guide: Microsoft Dynamics 365 Finance And Operations - Development Basic Notes >>>>> Download Full
>>>>> Download LINK